Install the goIbibo app on your mobile from https://play.google.com/store/apps/details?id=com.goibibo&referrer=utm_source%3Dhtml5%26utm_medium%3Dsite
Use the Promo Code 5CD1132
Get 1000 Rs. as the account balance for future bookings with GoIbibo.
Archive for the ‘Uncategorized’ Category
Goibibo 1000 Rs. goCash on app download
Posted: March 10, 2015 in UncategorizedTags: GoIbibo, Goibibo Promo Code, Promo Code
Bootable windows USB using Ubuntu
Posted: January 11, 2015 in UncategorizedTags: 7z, Bootable Usb, gparted, Ubuntu, Windows
Ubuntu has already an application called Startup Disk Creator, but this can only be used to make Linux bootable USB drives. To make a Windows bootable USB there is an application called WinUSB but it hasn’t been updated for a while.
The following guide works on any Linux distribution as long as it has GRUB and GParted installed and can make bootable USB for any Windows version newer than Vista (including Vista too).
Choose whatever method is suitable for your computer (either MBR for BIOS or GPT for UEFI – do NOT follow both tutorials as you’ll get a non-bootable USB). Note that the drive made for UEFI will not boot on BIOS computers.
MBR for BIOS
This is intended for older PCs that use BIOS. The USB can also be used on UEFI computers in CSM boot mode. A msdos partition scheme and a bootloader will be required.
1. Format USB
This is the first step. Although it can be done from Terminal, GParted has a nice GUI and it is easy to use for this. So, plug in your USB and start GParted (root permissions required). Select the USB drive and unmount it, otherwise you won’t be able to format it.
 |
| GParted main window. The first thing to do is select the USB drive. |
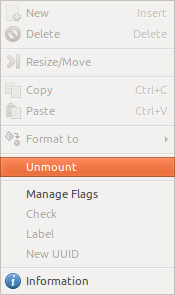 |
| Right-click the USB drive partition and select Unmount |
You must re-create the partition table by going to the Device menu then select Create Partition Table. Choose msdos and click Apply. Note that it may work with a simple formatting without rewriting partition table.
 |
| The Partition Table dialog. |
Right click the unallocated space and select New. Make a primary NTFS partition and give it a label too. Remember the label as you will need it later.
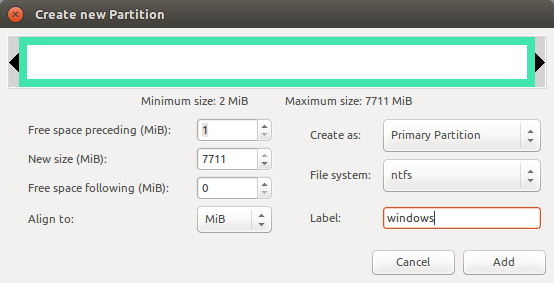 |
| New Partition dialog. |
Apply all pending operation from Edit menu – Apply all operations or click the button on the main window. Right click the partition and add the boot flag by selecting Manage Flags and tick the checkbox next to boot.
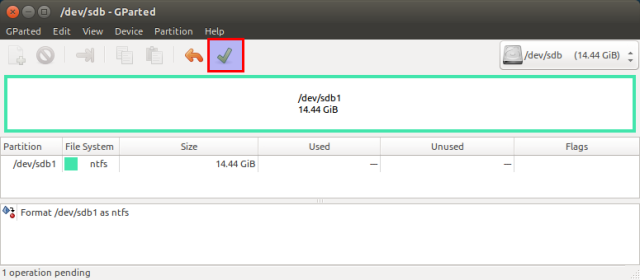 |
| The Apply button from the main window of GParted |
When installing bootloader, a partition UUID must be specified. So, right-click the partition again and select Information. Write down that UUID as you will need it later.
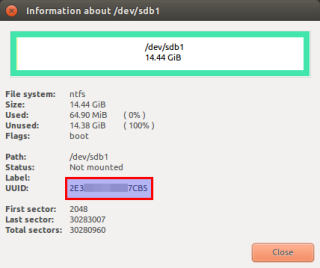 |
| The Information dialog showing UUID |
2. Copy Windows files
Quit GParted and use the file manager to copy all files from Windows ISO to USB stick. Mount the ISO using Open with – Disk Image Mounter (if you use Nautilus as a file manager). Then select all files Ctrl+A and Copy to USB drive which will be automatically mounted when you click on it at /media/<username>/<drive_label>. After the copy process is finished, look in the USB root folder for the boot directory. If it is uppercase, rename it to lowercase.
3. Make it bootable
GRUB will be used for that. Open a Terminal and run:
sudo grub-install --target=i386-pc --boot-directory="/media/<username>/<drive_label>/boot" /dev/sdX
Replace:
- /media/<username>/<drive_label> with the path where USB drive is mounted
- /dev/sdX with the USB drive, not the partition (e.g. /dev/sdb)
Installing for i386-pc platform.
Installation finished. No error reported.
grub-install: error: /usr/lib/grub/i386-pc/modinfo.sh doesn't exist. Please specify --target or --directory.
Install the grub-pc-bin package with sudo apt-get install grub-pc-bin and try again.
Now, create a text file and write the following in it:
default=1
timeout=15
color_normal=light-cyan/dark-gray
menu_color_normal=black/light-cyan
menu_color_highlight=white/black

menuentry "Start Windows Installation" {
 insmod ntfs
 search --no-floppy --fs-uuid <drive_UUID> --set root
 chainloader +1
 boot
}

menuentry "Boot from the first hard drive" {
 insmod ntfs
 insmod part_msdos
 set root=(hd1)
 chainloader +1
 boot
}
Replace <drive_UUID> with the UUID from step 1. Save the file as grub.cfg and put it on the USB drive in the boot/grub folder.
That’s it. The USB drive is now bootable from BIOS (not UEFI) and can be used to install Windows on your PC. The first time you boot from it select Start Windows Installation. Tested with Windows Vista, but it should work with any newer version.
GPT for UEFI
UEFI boots from GPT schemed drives. No bootloader is required because EFI firmware can read FAT32 partition contents by itself. It looks for a specific firmware and if it founds it then loads it into RAM. Without a MBR bootloader the USB will not be bootable for BIOS computers. Only 64 bit versions of Windows 7 and newer are supported according to eightforums.com.
1. Format USB
Plug in the USB drive and launch GParted. Unmount the drive as shown above. Create a GPT partition table by selecting from Device menu Create Partition Table option. Choose gpt and apply.
 |
| The Partition Table dialog |
Now right-click the unallocated space and create a new partition. It must be primary and formatted as FAT32. Give it a label too.
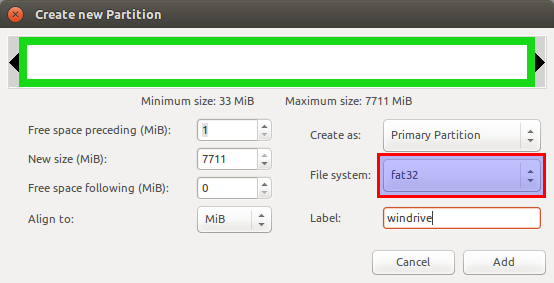 |
| New Partition dialog |
Don’t forget to apply all pending operations Ctrl+Enter.
2. Copy Windows files
Quit GParted and use the file manager to copy all files from Windows ISO to USB stick. Mount the ISO using Open with – Disk Image Mounter (if you use Nautilus as a file manager). Then select all files Ctrl+A and Copy to USB drive which will be automatically mounted when you click on it at /media/<username>/<drive_label>. After the copy process is finished, look in the USB root folder for the efi/boot directory. If there’s a bootx64.efi file there skip to step 3.
If the OS you are making a bootable USB for is Windows 7, browse the efi/microsoft folder and copy the entire boot folder from this path one level up in the efi folder. Merge folders if boot already exists.
Here is what to do if you don’t have the bootx64.efi file in efi/boot folder. Browse into the mounted Windows ISO image into the sources folder. Open install.wim with your archive manager (you will need 7z installed). Go to the path ./1/Windows/Boot/EFI and extract the file bootmgfw.efi anywhere you want. Rename it to bootx64.efi and put it on the USB drive, in the efi/boot folder. If you can’t find bootmgfw.efi in install.wim then you probably have a 32 bit Windows ISO or other types of images (recovery disks, upgrade versions).
Some UEFI firmwares are able to boot from NTFS and/or MBR partitions too as long as the bootx64.efi file exists at the right locations.
3. Make it bootable
It should be bootable. You can boot from USB now. The Windows-only utility Rufus does exactly the same thing when UEFI/GPT mode is selected.
Unless you can’t, do the following.
Launch GParted again and select your USB drive. Right-click the partition and assign it the boot flag (esp will get checked too). Note that msftdata will get unchecked. This boot flag makes the USB drive act as an ESP (EFI System Partition) so the first thing you’ll notice is that your OS (both Linux and Windows) is no longer auto mounting it. Do not boot your Linux OS with that USB plugged in (it may get automatically mounted at /boot/efi or something like that and it may interfere with the bootloader from HDD). To get back the USB drive, plug it in with the PC on, open GParted and check back msftdata.
If this didn’t work too, start over again but this time apply the msdos partition table instead of gpt. There will be no msftdata flag this time and boot flag has a totally different meaning.
- Go to http://192.168.1.1 and login to your router. If you’ve never done this, look for instructions that came with your router or do a google search to find the default username and password.
- Find a page that has QoS settings. For the E1200, you need to click on “Applications & Gaming” and select the “QoS” sub-menu.
- Disable WMM Support.
- Click save.
Ubuntu Brightness issue resolved
Posted: September 10, 2014 in UncategorizedTags: Brightness, Brightness Controller, Ubuntu 14.04, ubuntu brightness problem, xrandr
With Ubuntu 14.04, by default there are no options to modify the brightness of the system. However there is an app for same called brightness controller. But I had problems setting up the brightness for the boot time itself. So I decided to find out how did the Brightness Controller work. I downloaded the source code from the git page and found out that internally it uses the Xrandr . So I added the Xrandr command to my bashrc file and now I don’t have to set the brightness every time.
jkapil@jkapil-desktop:~$ xrandr

Screen 0: minimum 320 x 200, current 1366 x 768, maximum 32767 x 32767

VGA1 connected primary 1366x768+0+0 (normal left inverted right x axis y axis) 0mm x 0mm

1366x768       60.0*+

1024x768       75.1     70.1     60.0

800x600        72.2     75.0     60.3

640x480        75.0     72.8     60.0

720x400        70.1

HDMI1 disconnected (normal left inverted right x axis y axis)

HDMI2 disconnected (normal left inverted right x axis y axis)

DP1 disconnected (normal left inverted right x axis y axis)

DP2 disconnected (normal left inverted right x axis y axis)

VIRTUAL1 disconnected (normal left inverted right x axis y axis)
This gives you the output names associated with your display. In my case its VGA1. To set the brightness,
$xrandr --output VGA1 --brightness 0.7
–brightness value is in between 0 and 1 and is a fraction. First execute in terminal to find out the brightness value soothing to your eye and then put that value with the above command in your .bashrc file in home directory.
TCS world 10K 2014
Posted: May 12, 2014 in UncategorizedTags: Namma Bengaluru Run, Open 10K run, TCS marathon bangalore, TCS run, TCS World Open10K Run, World 10K run
This is that time of the year when Namma Bengaluru gets their running shoes out of the closet and start practicing everyday for the Bengaluru’s most awaiting run of the year, TCS world 10K run. This year its happening on 18th of May and the city is filled up with enthusiasm. I have many of my friends participating in this run. While i won’t be running this time as I will not be in city but I will certainly miss the zeal of the event. Other than open 10K, there is world 10K, mazza run, corporate champion, senior citizen run and champion with disability for the differently able people.
Here is the link to the event’s official website. All the best to all the runners. Run for a cause, run for your health or just simply run and experience the euphoria of the Namma Bengaluru run.
Lok Sabha Elections 2014
Posted: April 17, 2014 in UncategorizedTags: 5th stage Lok Sabha Election, AAP, BJP, Lok Sabha Election 2014, Modi, NaMo, VoteForIndia, VoteIndiaVote
Today I casted my vote for the first time. Today 5th stage of the Lok sabha election 2014 is going on as I write this post in 120 constituencies across 12 states of India. This time, most of the people are confused whether to vote for a corruption free government AKA Aam Aadmi Party or Development Oriented ruler AKA Narendra Modi (I won’t say BJP 🙂 ). Though whoever wins, but this election looks to be a forward progress towards building a strong nation. If Modi becomes PM and fulfills the expectation he has set by now, its all good otherwise the AAP is another alternative of which I am sure people are going to throne in state elections. But this time it seems to be a clear fight between two good alternatives and selection of either is going to help the country in one way or other. This election is also seeing a good rise in percentage of people casting their votes to select their leader rather than cribbing about the political parties after elections.
I would say if you have to cast your votes, choose either of these parties rather than wasting your vote on some regional party. Make this election bipartite and let the all other Mulayams and Ammas know that the country needs broader issues to be addressed than the local dirty vote bank politics.
Vote For Your Own Government, Vote For India.

Gmail Glitch Is Causing Thousands Of Emails To Be Sent To One Man’s Hotmail Account
Posted: January 24, 2014 in UncategorizedA trip to Pondicherry, Mahabalipuram and Yelagiri
Posted: September 30, 2013 in UncategorizedTags: Life, Mahabalipuram, Pondicherry, Travel, Yelagiri
Visiting places is always wonderful but what makes it more wonderful is the people who are accompanying you to those places.
A long weekend was coming on Aug 9th. As usually happens with IT people in Bangalore, any long weekend is ticket to some outstation. Like all many, we planned to go for pondicherry. On the way back, we planned to go for Mahablipuram and do a trek in Yelagiri. We booked a Qualis and left from Bangalore on thursday evening. Lucky for us that we had Bhavana who can communicate in South Indian languages and our driver Sateesh was not that good with Hindi or English. It turned out that Sateesh was a talkative person and since other than Bhavana nobody knew Kannada, so she had to listen and translate each time he said something.
An overnight journey on the typical Indian Roads meant nobody got a good sleep. Mehetab was in front guiding the driver throughout the night using google maps. Biplob and Himanshu enjoyed the bumps on the backseats while me, Bhavana and Monica occupied the middle seats. Whole night, Mehetab kept on writing something deep in his phone which he showed to me few days later. Quite a piece he wrote.
Morning 6’o clock, we were in pondicherry at Auro Beach.

The big ocean, Bay of Bengal, was in front of us. I had a morning run on the beach and soon the beach was not scenic. There were polythene bags lying all around, people attending the call of nature. So we turned back to our hotel to get fresh and go find a Mosque so that Mehetab could attend the morning prayers of Eid-Al-Fitr. While he was attending the prayers, we found this small place, which looked like some temple from outside, to get the morning breakfast. We got poori-sabzi for the breakfast along with some vadas and idly and being from New Delhi, I would say I found the taste to be way better than I could have had ever imagined. After breakfast, we all were feeling sleepy. Since we had to wait for Mehetab to complete the Namaaz, myself, Himanshu and Biplob decided to have a nap in vehicle itself while Monica and Bhavana decided to get a walk in the city.
It was noon time and we were at Auro Ashram. It is a silent place where followers of Shri Aurobindo comes to visit his mausoleum and meditate. Photography is not allowed there. One can get some books about the life of Sri Aurobindo and the mother, which are also available in many foreign languages. Ashram is quite beautiful. You can find a no. of varieties of Cactus which looks very beautiful. One can easily make this observation that Pondicherry is not like the other cities with Beaches but it has its own calmness. Its a good place to get relaxed and just do nothing. After Auro Ashram, we headed towards Promenade beach while taking some walks in the streets of Pudducherry. There are several ministries located near the Promenade beach area. Governer’s house looks like a big white church from outside. This area of pondi is also known as French Colony. A lot of houses bears the name plates in french. There is one big park in the same locality which adds the beauty to it.

Promenade is not like other regular beaches. Its a rocky beach where government has put big stones to keep the city safe against the big waves. Just sit on the rocks and listen to some poetry. I am sure that many philosophers have got their wisdom thoughts sitting at that place. There are hawkers around selling lots of eataries. Soon we departed for Auroville, a place which is known as “a different world altogether inside pondicherry”. There is a big Matre Mandir under construction and is told to have the soils from 80+ countries. As per the running projet, the temple is in form of a big golden sphere and will be surrounded by a no. of beautiful gardens each garden bearing a theme suggested by The Mother, Mirra Alfassa.

On your way to Matre Mandir from Auroville, you will find a no. of stones bearing the picture of some flower with a philosophical quote.
It had been a lot of sightseeing since morning and now was some fun time. So we went to Paradise beach, had the swimming gears on and jumped in the Ocean. This was the only beach in pondi which was a bit cleaner than other beaches but still no match to the Arabic Ocean Beaches. Following the paradise, there is a private beach, Kailash Beach, where guards keep patrolling and wont let people from other beaches to enter. Me and Mehetab wanted to have a run on the shores, so we decided to go through the water. We had a run of around 8-10 KM covering 3-4 beaches.

We came back to Promenade beach for our dinner and had a beautiful night walk afterwards on the MG Road.

Never check-in to a hotel early in the morning because it follows the early morning checkout also which was quite painful next day. Anyways, getting ready early, breakfast at same temple like small place, we went to Promenade back as some of us had to shop.

While others were busy shopping, me and Mehetab walked around and found french Institute of Pondicherry. Its a huge building with a sea facing library, only library where students would love to sit for hours 😛 .
On our way to Mahabalipuram, we had lunch at chettinad hotel where you can find Chicken, Mutton and Fish Gravies without Chicken, Mutton and Fish 😉 (I can have a laugh being a vegetarian 🙂 ).

Evening 5’o clock, we were in Mahabalipuram admiring the historical structures some of which were made of single stones. After Tsunami, many ancient temples have been unearthed in Mahabalipuram. Main temple is in need of saving as the sea winds are leading to the corrosion of stones.
It was getting late at night so we decided to have night stay in Kanchipuram and started for Yelagiri around 3’o clock in the morning. On our way to uphill, me and Mehetab decided to get down while there was still 4Km left to cover and decided to go through all the bushes and rocks doing a trek of our own, making our own way. Getting scratched, bleeding but enjoying the path.

Then we just rested in Yelagiri for the day. Lying there in music fountain park, talking about our childhood and making the discovery of OLAKUTTI, we all had a great fun.

A trip, at the start of which many of us didn’t know each other, brought us closer to each other and made new friends.


